Fix Undo Shortcut Key in Photoshop CC 2019

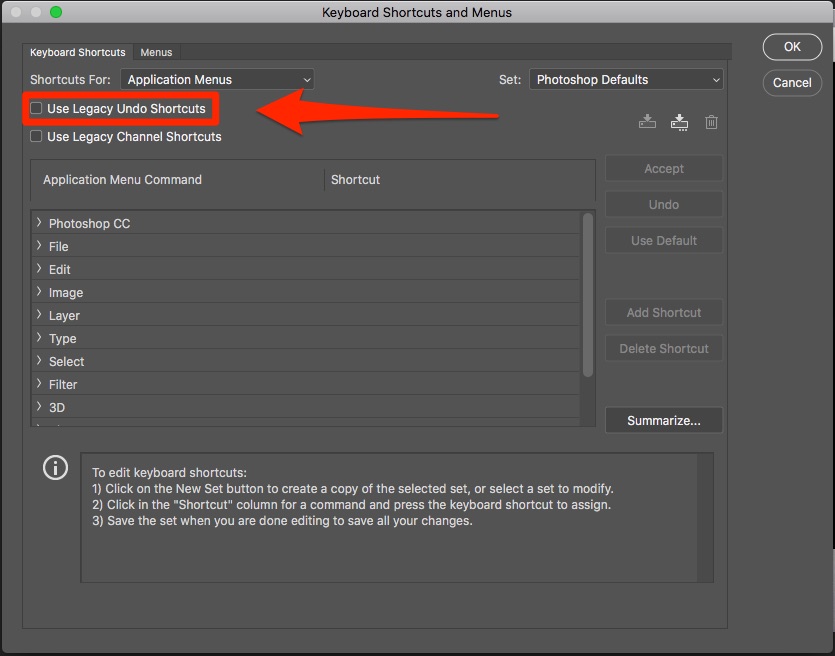
Location of legacy undo shortcut in Photoshop

If you are a Photoshop user who did not celebrate the change of Undo’s keyboard shortcut to CMD+Z (Mac) CTRL+Z (PC) from the old guard of CMD+OPT+Z/CTRL+ALT+Z then I’m here to help.

You can change back to the legacy Undo shortcut by going to Edit > Keyboard Shortcuts

While the short term benefit of using the legacy shortcut key is uninterrupted workflow, I advise getting used to the change sooner than later.

Lightroom vs Adobe Bridge

My article was originally posted on TipSquirrel, February 23, 2010. I’ve updated the information to reflect the latest Adobe products.

It may come as a shock, but with the pending releases of Lightroom 3 and CS5 currently on the brain, folks still have time to debate whether to use Lightroom or Adobe Bridge.

Really? This is still a question? *grin*

Actually, I can understand the confusion. Perhaps you started off with a copy of Scott Kelby’s Photoshop CS5 for Digital Photographers learned all about Bridge, incorporated Camera RAW into your workflow, only to feel bamboozled when you later discovered Scott also has a book entitled Lightroom 3 for Digital Photographers. Huh? It’s simple, before Lightroom came along many photographers used Photoshop and therefore Bridge to organize & process images. I have all five revisions of Scott’s PS 4 Photogs series, and Lightroom wasn’t on the scene until the 3rd book.

But I digress…

You want to know the differences between Lightroom & Bridge? You want to know absolutely which one to use & when? Let me break it down for you:

Defining The Programs

1. Adobe Bridge is a file browser. Cooler than Finder, hipper than Explorer.

2. Adobe Camera RAW is an image processor so good JPEGs asked for an invitation.

3. Photoshop is the ultimate program for manipulating raster images, but you knew that already.

4. Lightroom was designed from the ground up to be a single program solution for photographer workflow. Built around a database (Lightroom’s catalog files), users can quickly organize, process & output files.

The key is while photographers use Adobe Bridge, Camera RAW & Photoshop, Lightroom was built for photographers. It even says so in the Lightroom FAQ.

Investing in The Software

1. Spend $999 for Photoshop CS5 Extended which comes with Bridge & Camera RAW.

2. Spent $299 for Lightroom 3. Take the extra $700 buy a nice camera and Photoshop Elements 9 ($79 after rebate).

Comparing The Workflows

1. Organize with Adobe Bridge. Process with Adobe Camera RAW. Composite/finish with Photoshop. Output with Adobe Bridge (PDFs, slideshows, websites) or Photoshop (print).

2. Organize with Lightroom’s Library module. Process with Lightroom’s Develop module. Roundtrip hand-off to Photoshop for compositing or effects. Output with Lightroom’s Slideshow, Print or Web modules.

The majority of photographer workflow can be done in Lightroom which is a single program versus Adobe Bridge & Camera RAW. What about Photoshop you ask? Lightroom isn’t Photoshop, and it’s not meant to be.

Differences in Program Workflows

1. As a file browser, Adobe Bridge is excellent for those moments when you need to preview digital files. Whether it’s external hard drives, downloaded Internet files, DVD/CD media or devices such as cameras or PDAs, Bridge has the ability to look at the files directly on the media. No import necessary.

Lightroom requires you to import files before you can make changes. Sure you can preview files, but it’s through the Import Dialogue screen.

2. Adobe Bridge reads multiple media types including video, vector & raster images, Flash & Quicktime, even PDFs.

Lightroom only reads JPEG, TIFF, DNG or RAW files.

3. Adobe Bridge can only work directly with files via connected drives or devices.

Lightroom writes all changes to the catalog database files, allowing you to do certain organizational tasks even when drives & devices have been disconnected. Plus DATABASE=SPEED.

Working Together

1. Metadata written to files with Adobe Bridge can be picked up on import through Lightroom. Lightroom catalog changes can be saved to file which can be read directly in Bridge.

2. Adobe Camera RAW & Lightroom’s Develop module use the same technology. While the interfaces may have different layouts, the sliders & tools work the same. Settings made in one program can be edited in another.

If you know Adobe Bridge/Camera RAW working in Lightroom shouldn’t be an issue. Same if you have to jump over from Lightroom to Camera RAW. Don’t believe me, Scott Kelby has been saying the same thing for years.

Summary

For the new photographer who hasn’t yet purchased software, Lightroom is a clear favorite in price. One single application to do everything, and if you need the things Photoshop can do, you can always start with Photoshop Elements.

As a professional who uses both pieces of software, I can tell you my photography workflow begins & ends in Lightroom. However, I do use Bridge quite a bit as a replacement for Finder on my Mac workstations.

If you’ve already made the investment in Photoshop CS5 you might be hesitant to up end your workflow and changeover to Lightroom. Bottom line it’s about efficiency. Lightroom cuts through the clutter and streamlines the process.
RAW vs JPEG – Practical Use for Designers & Photographers

Last week Firgs opened up her Designer Roundtable discussion with the topic RAW vs JPEG and whether it matters to designers. I responded in the comments that designers could simply use the JPEG provided to them or take advantage of what RAW has to offer for more creative post-processing.  She followed up with a question about practical things designers need to know about using RAW vs JPEG. With that here are my Top Five Things to know about RAW vs JPEG:

1. White Balance.
When using Adobe Camera RAW or Lightroom, you have the ability to change the image white balance without affecting image quality. In fact, the white balance settings will reflect the available features in camera, e.g., Daylight, Fluorescent, Tungsten, Flash, etc. You can also choose “As Shot” or let the program Auto white balance. When creating a custom white balance you can read & adjust the color temperature of the RAW file.

When using a JPEG file  you can adjust white balance, but it’s not the same as changing the settings. Adobe Camera RAW & Lightroom only give you three choices–Auto, As Shot or Custom. When creating a custom white balance setting you make a +/- adjustment without seeing the color temperature.

Read More

Photoshop – Sizing Images

As originally posted on Tip Squirrel July 2009. I’m not one to mince words, so let’s jump right into this morning’s lesson. We’re going to discuss Image Sizing. Often overlooked, sometimes confusing, easily dismissed, but oh so important. First thing is to get to the Image Size command: Press CMD+OPT+I (CTRL+ALT+I) to open the Image Size dialogue or choose Image->Image Size from the Photoshop menu.

Pixel Dimension for Screen / Document Size for Print

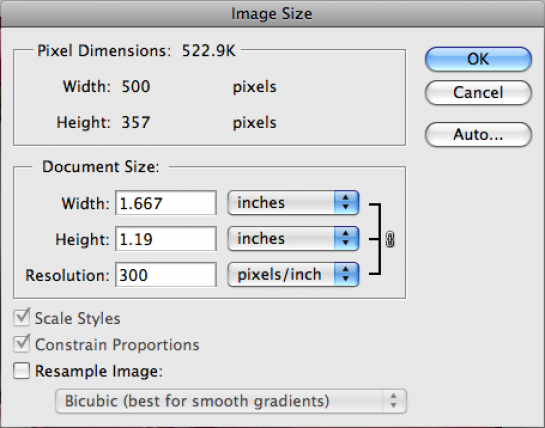
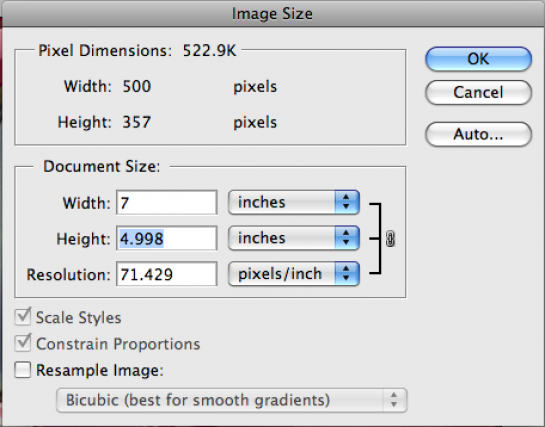
Notice the two distinct areas for sizing an image – Pixel Dimensions and Document Size. Pixel Dimensions are used to size an image for a display, e.g., monitor, overhead projector, television. Document Size is necessary when outputting an image for print.

Resampling Changes All Field Values (Resolution x Size = Pixel Dimensions)

When “Resample Image” is checked, changing values in any field effects the entire dialogue. If you look closely you can see that the resolution of the image (300) multiplied by the height in inches (5) gives us a requirement of 1500 pixels to print. (300×5=1500). Resampling changes the pixel dimensions and total pixel count.

Whenever I size an image, I always set the resolution field first. Once that’s set, then I move to the appropriate width & height field for outputting my image.

No Resampling Means Image Integrity is Maintained.

When “Resample Image” is unchecked notice how the Pixel Dimensions become locked. Adjusting resolution will simply increase or decrease the size of an individual pixel. The integrity of the image does not change because the pixel count stays the same.

Notice how the image went from being a 5×7 print to less than two inches in size. (300×1.667=500).

In the above figure any attempt to get a 5×7 print results in lower resolution. Because “Resample Image” is unchecked, there are only 500 pixels for width & 357 pixels for height.

It’s the Total Number of Pixels, not Resolution You Should Watch

I often hear folks argue about resolution in terms of printing, but what’s most important is the total number of pixels when the image is first opened. An image from a digital camera measuring 3500×2400 pixels gives you a lot more options for output then one taken off the Internet at 400×250. It will always be easier to take a large image, and reduce the size, then to take a small image an size it up. Resampling is not bad, but you are either deleting existing pixels (downsampling) or creating new pixels (upsampling). Some resolution values to keep in mind:

Screen resolution – 72-96ppi – PowerPoints, websites, emails, TV Office printing – 150ppi – laser or inkjet printing, drafts, proofing Professional printing – 240-300ppi – can be higher, but these values tend to work just fine

Keep in mind, resolution can be set TOO HIGH. If your desktop printer is rated at 240ppi you receive no benefit from outputting an image at 600ppi. In fact, you offload the resampling onto the printer which will result in a pixelated image.

Quick Crop Tool Tip

As a final tip, if you really dislike the Image Size dialogue, you can skip it and use the Crop Tool instead. Simply specify the width, height AND resolution, and your image will be resampled appropriately. (Keep in mind, all the rules still apply, the Crop Tool just executes commands quicker)

Cheers!