Lightroom 3 & Photoshop CS5 FREE Online Videos

Good afternoon all! It’s me, you’re humble Adobe Instructor back from the blogging break.

If you’re not already using my iPhone app then you may not be aware I’ve been posting videos for the latest Lightroom 3 & Photoshop CS5. Click over to the new Media Cats Learning Center or catch me unfiltered on YouTube for the latest video offerings. In the upcoming weeks I’ll be launching a new webinar series that will run twice a month. Watch for announcements on Facebook & Twitter.

That’s it for now. Enjoy the rest of your week.

Adobe Photoshop CS5 Video Tutorials

UPDATE 07/22/2010 – Come back each week for Tip Tuesday video tutorials, written tutorials, or subscribe to my unfiltered YouTube channel.

In case you missed it last week, I posted some Photoshop CS5 videos along with the rest of the Photoshop Nuts over at TipSquirrel. Here’s a breakout of the posting schedule:

TUE, April 13 Bridge Improvements Mike Hoffman
WED, April 14 Content Aware Fill Janine Smith
THU, April 15 Refine Edge & then HDR
Yours Truly
FRI, April 16 Bristle Brushes, Mixer Brushes Tim Shelbourne
==== ========== ====
MON, April 19 Scrubby Zoom & then CS Review Yours Truly
TUE, April 20 Lens Correction & ACR Justin Seeley
WED, April 21 Content Aware Healing Janine Smith
THU, April 22 Puppet Warp Justin Seeley
FRI, April 23 Layer Management Mike Hoffman

The response to the videos has been great! Thanks to everyone for getting the word out, and I’ll be posting more CS5 coverage over the next few weeks.

Create a Rubik’s Cube Photo Frame with Photoshop

Yesterday, Janine Smith posted a Photoshop tutorial over on TipSquirrel entitled Cubism. If you don’t know Janine, she’s an award-winning photo restoration artist, and MUCH MORE creative than myself. Before you watch my video, be sure to read her tutorial. (That’s where you’ll find the PSD file Janine created that I use in the video) It’s a great idea, and I wish I had thought of it. Being the Photoshop technician that I am, I quickly broke down the steps to come up with Cubism 2.0. That’s the great thing about Photoshop–talk to 100 different experts you’ll get 100 different methods to accomplish the same task. Thanks to Janine for being this morning’s Photoshop inspiration. Enjoy!

NAPP Nation – Photoshop World Orlando 2010

I’m still coming down from the high that is Photoshop World. Truly, as an adult it has become my favorite holiday. This was my 6th visit to PSW, but the first time I’ve attended in the spring. It was fun to catch all the great performances BEFORE everyone has a chance to talk about it on Facebook & Twitter. The party’s a lot more exciting when you don’t know what’s coming.

I thoroughly enjoyed the time spent in Orlando, and it was great to meet so many Twitter & Facebook folks in person for the first time. Chatted with Adobe folks at the Tweetup, and celebrated my 40+ birthday during the NAPP forum party. I met the genius that is @ErikBernskiold, chatted with fab designer @Firgs, hung out with the likes of @Elorg, @EGower, @AprilAndrews & the infamous @Vanelli. Caught up with friends Dawn, Terry & Heather, had a chance to chat some with David Ziser and his lovely wife LaDawn. I have been through most of the classes at PSW, so I was really looking forward to seeing new presentations. Zack Arias DID NOT disappoint. Walked away humbled, and excited at the possibilities. Of course, you can’t go wrong watching Joe McNally, and I enjoyed catching RC talk about websites for photographers & Rod Harlan share his knowledge of social media. Missed Alan Hess Precon, but had a chance to catch his session, and chat with him after the After Party. Some amazing talent at PSW, met Michael Green at the NAPP forum party (he’s featured in the Westcott catalog don’t ya know), Joey Wright at BB Kings (designers who photograph have an edge), chance encounter with Sandy Foster (from Dallas) at the NAPP forum party the day before she won the Vinny–CONGRATS AGAIN!!!

People ask me why I attend over & over–how could you not want to be around the best in the world as often as possible? I can’t emphasize this enough Photoshop World is THE learning conference to attend if you are a creative. I’ve been to Imaging USA, MacWorld & other events. Other conferences serve as infomercials for their presenters & vendors. PSW is not only a fun place to network with other creatives, THIS conference provides classes that educate, inspire & motivate the artist in all of us.

In summary:

Scott Kelby tells you what you missed at Photoshop World.

Terry Reinert has some ideas on what to do now that Photoshop World is over.

Here’s a quick Flickr gallery of snaps from PSW.

Photoshop – Sizing Images

As originally posted on Tip Squirrel July 2009. I’m not one to mince words, so let’s jump right into this morning’s lesson. We’re going to discuss Image Sizing. Often overlooked, sometimes confusing, easily dismissed, but oh so important. First thing is to get to the Image Size command: Press CMD+OPT+I (CTRL+ALT+I) to open the Image Size dialogue or choose Image->Image Size from the Photoshop menu.

Pixel Dimension for Screen / Document Size for Print
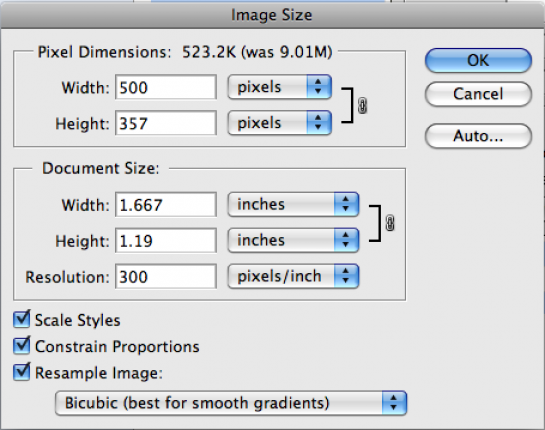
Notice the two distinct areas for sizing an image – Pixel Dimensions and Document Size. Pixel Dimensions are used to size an image for a display, e.g., monitor, overhead projector, television. Document Size is necessary when outputting an image for print.

Resampling Changes All Field Values (Resolution x Size = Pixel Dimensions)
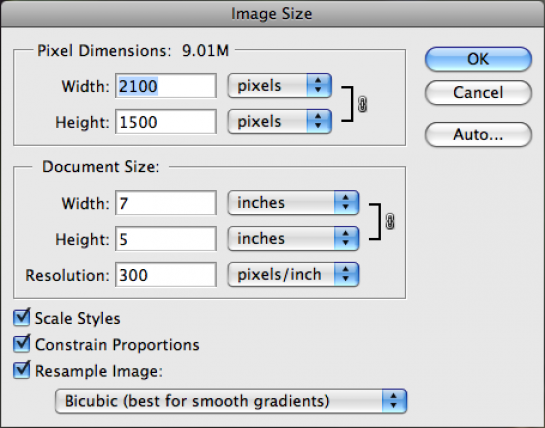
When “Resample Image” is checked, changing values in any field effects the entire dialogue. If you look closely you can see that the resolution of the image (300) multiplied by the height in inches (5) gives us a requirement of 1500 pixels to print. (300×5=1500). Resampling changes the pixel dimensions and total pixel count.

Whenever I size an image, I always set the resolution field first. Once that’s set, then I move to the appropriate width & height field for outputting my image.

No Resampling Means Image Integrity is Maintained.
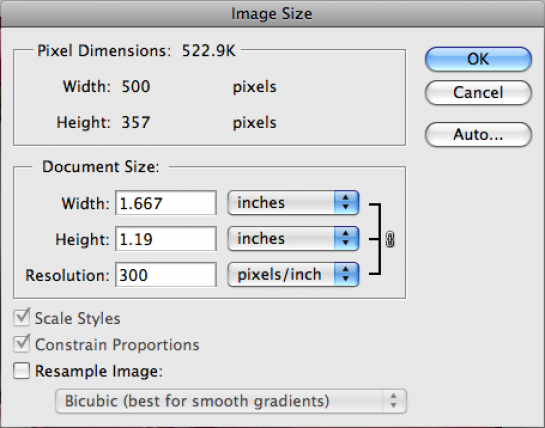
When “Resample Image” is unchecked notice how the Pixel Dimensions become locked. Adjusting resolution will simply increase or decrease the size of an individual pixel. The integrity of the image does not change because the pixel count stays the same.

Notice how the image went from being a 5×7 print to less than two inches in size. (300×1.667=500).
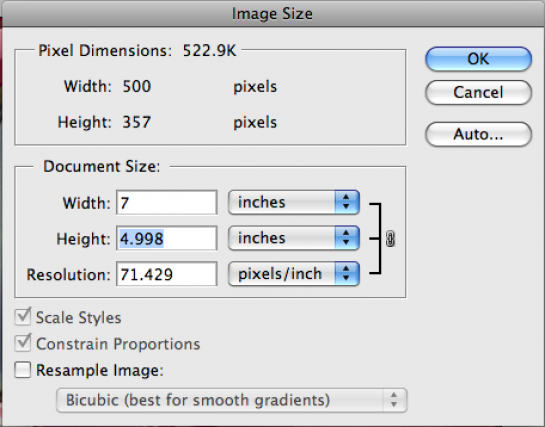
In the above figure any attempt to get a 5×7 print results in lower resolution. Because “Resample Image” is unchecked, there are only 500 pixels for width & 357 pixels for height.

It’s the Total Number of Pixels, not Resolution You Should Watch

I often hear folks argue about resolution in terms of printing, but what’s most important is the total number of pixels when the image is first opened. An image from a digital camera measuring 3500×2400 pixels gives you a lot more options for output then one taken off the Internet at 400×250. It will always be easier to take a large image, and reduce the size, then to take a small image an size it up. Resampling is not bad, but you are either deleting existing pixels (downsampling) or creating new pixels (upsampling). Some resolution values to keep in mind:

Screen resolution – 72-96ppi – PowerPoints, websites, emails, TV Office printing – 150ppi – laser or inkjet printing, drafts, proofing Professional printing – 240-300ppi – can be higher, but these values tend to work just fine

Keep in mind, resolution can be set TOO HIGH. If your desktop printer is rated at 240ppi you receive no benefit from outputting an image at 600ppi. In fact, you offload the resampling onto the printer which will result in a pixelated image.

Quick Crop Tool Tip

As a final tip, if you really dislike the Image Size dialogue, you can skip it and use the Crop Tool instead. Simply specify the width, height AND resolution, and your image will be resampled appropriately. (Keep in mind, all the rules still apply, the Crop Tool just executes commands quicker)

Cheers!