Photoshop – Sizing Images

As originally posted on Tip Squirrel July 2009. I’m not one to mince words, so let’s jump right into this morning’s lesson. We’re going to discuss Image Sizing. Often overlooked, sometimes confusing, easily dismissed, but oh so important. First thing is to get to the Image Size command: Press CMD+OPT+I (CTRL+ALT+I) to open the Image Size dialogue or choose Image->Image Size from the Photoshop menu.

Pixel Dimension for Screen / Document Size for Print

Notice the two distinct areas for sizing an image – Pixel Dimensions and Document Size. Pixel Dimensions are used to size an image for a display, e.g., monitor, overhead projector, television. Document Size is necessary when outputting an image for print.

Resampling Changes All Field Values (Resolution x Size = Pixel Dimensions)

When “Resample Image” is checked, changing values in any field effects the entire dialogue. If you look closely you can see that the resolution of the image (300) multiplied by the height in inches (5) gives us a requirement of 1500 pixels to print. (300×5=1500). Resampling changes the pixel dimensions and total pixel count.

Whenever I size an image, I always set the resolution field first. Once that’s set, then I move to the appropriate width & height field for outputting my image.

No Resampling Means Image Integrity is Maintained.
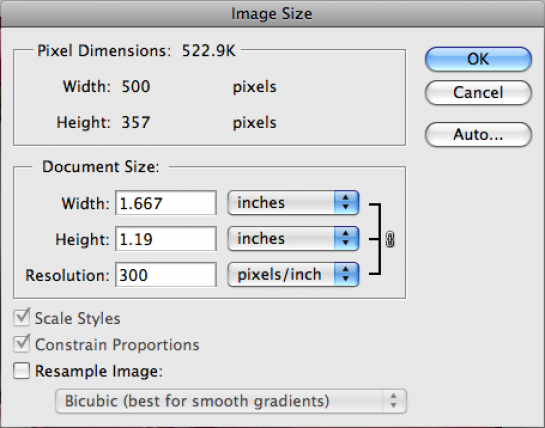
When “Resample Image” is unchecked notice how the Pixel Dimensions become locked. Adjusting resolution will simply increase or decrease the size of an individual pixel. The integrity of the image does not change because the pixel count stays the same.

Notice how the image went from being a 5×7 print to less than two inches in size. (300×1.667=500).
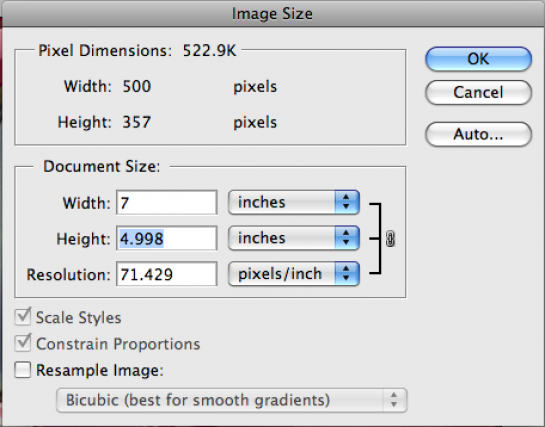
In the above figure any attempt to get a 5×7 print results in lower resolution. Because “Resample Image” is unchecked, there are only 500 pixels for width & 357 pixels for height.

It’s the Total Number of Pixels, not Resolution You Should Watch

I often hear folks argue about resolution in terms of printing, but what’s most important is the total number of pixels when the image is first opened. An image from a digital camera measuring 3500×2400 pixels gives you a lot more options for output then one taken off the Internet at 400×250. It will always be easier to take a large image, and reduce the size, then to take a small image an size it up. Resampling is not bad, but you are either deleting existing pixels (downsampling) or creating new pixels (upsampling). Some resolution values to keep in mind:

Screen resolution – 72-96ppi – PowerPoints, websites, emails, TV Office printing – 150ppi – laser or inkjet printing, drafts, proofing Professional printing – 240-300ppi – can be higher, but these values tend to work just fine

Keep in mind, resolution can be set TOO HIGH. If your desktop printer is rated at 240ppi you receive no benefit from outputting an image at 600ppi. In fact, you offload the resampling onto the printer which will result in a pixelated image.

Quick Crop Tool Tip

As a final tip, if you really dislike the Image Size dialogue, you can skip it and use the Crop Tool instead. Simply specify the width, height AND resolution, and your image will be resampled appropriately. (Keep in mind, all the rules still apply, the Crop Tool just executes commands quicker)

Cheers!

Website RSS Feed Update

Good afternoon dear readers!

This is just a quick update to let you know there will be some changes to the website in the next few weeks. The biggest change will be the use of Category Feeds. As longtime readers know this blog has covered a wide range of topics ranging from entertainment to games to politics, fitness & health and of course Adobe software.

Having individual category feeds will make the blog more useful to everyone. In the future you’ll be able to pick the category you want to follow, and you can ignore the rest of my ramblings. Given my schedule this is the best option versus starting another blog, or two, or three.

So there you have it. I’ll announce the updates when they’re online, and I appreciate your continued patronage of the blog.

Photoshop – Curves vs Levels

Good morning everyone. The following Photoshop video tutorial breaks down the advantage of using Curves versus Levels. Choose Levels to make sweeping changes in the shadow, midtone & highlight areas. Choose Curves for more refined control of the overall tonal range. Checkout the video to see a demonstration.

iPhone App Reviews – MyFitnessPal vs DailyBurn

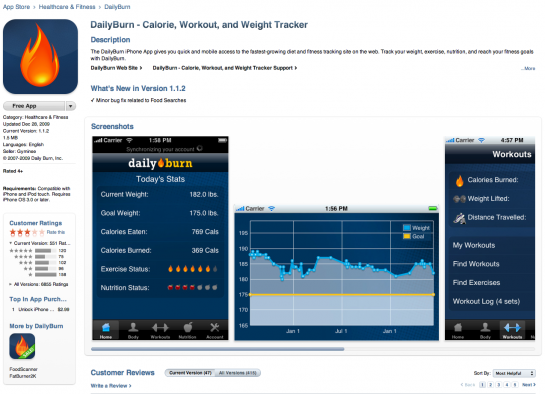
It’s week #2 of John P’s GetHealthy Challenge and I’m sitting here having lost 2lbs in about one week. That’s surprising given the fact that I cheated last week while in Oklahoma eating McDonalds not once, not twice, but THREE TIMES… the horror. However, in my defense I really only blew it once. After discovering my Double Quarter Pounder meal was over 1300 calories that was enough to make me think about just having a snack wrap the next time. I decided early on that if I was going to commit to this fitness challenge I would take advantage of any technical gadgets I could get my hands on. You see I love gadgets, and if I can find a legitimate use to buy/trade/download one then so be it. Today’s review is of two iPhone apps–My Fitness Pal & Daily Burn. Both apps do a good job of helping you track nutrition & exercise information which tie into the websites and online communities they support. That being said, neither app will work unless you sign up for a free website account. My intention is to primarily use the iPhone app as I hope to be moving around more, and sitting in front of my computer less. Also, given my schedule it’s more likely that my fitness diary will be entered on the go. Let’s get to the details of each app:

My Fitness Pal

The iPhone app and online web account are free.

The Good – My Fitness Pal has a well thought out interface. If you do not have an account you can create your profile directly from the iPhone app. You’ll be prompted to enter such info as current weight, goal weight, current height, activity level, weekly number of workouts planned, in addition to some personal info like your birthday & city location. The final step is to create your username/password and then you’ll be shown your calculated daily calorie summary. NOTE – I highly recommend getting the advice of your doctor or a professional nutritionist to calculate how many calories you need per day. My suggested calorie intake was a total of 1100 calories, which I found rather low. Fortunately, you can edit your profile info, so I changed the suggested number.

After creating my account I was able to jump in right away adding my first meal on record–Two Eggs Scrambled, Jimmy Dean Turkey Sausage, Pace Salsa – 289 calories. The Home screen shows a Daily Summary with the “Add to Diary” button easily recognized in the center of the app. Scrolling the Home page reveals detailed nutrition information, calculated from the foods you enter.

When adding new entries you can search for foods by name or brand, choose from your last entries, or create specific foods & meals. That’s right, you can group a series of foods into a meal which makes data entry even easier once you get a few items entered. The process is straight forward, and I found it easy to edit items such as number of servings or create meals.

The Bad – the application requires an Internet connection via WiFi or cellular. Entries cannot be entered offline. The workout section could be improved to capture & provide more information. Compared to the nutrition section of the app, the workout implementation feels light.

Daily Burn

The iPhone app and online web account are free. There is a PAID version of the app for $2.99 that has more features, and the website also has varying subscription level services. Daily Burn is also supported by a 2nd iPhone app called Food Scanner which is currently on sale for .99 cents.

The Good – The application has separate screen page icons that display your fitness progress, workout and nutritional summaries. Nutrition entries include a picture of the item as well as a capture of the product nutrition label. The workout section includes popular programs–even the Wii Fit–allowing for detailed progress of your workouts. The body section provides a graph which allows for a larger detail view simply by rotating the phone. This application interfaces directly with the Food Scanner which is a slick application. I found myself going through my pantry scanning stuff I had no intention of eating. Nice if you don’t like to type on your phone.

The Bad – The application interface requires too many page changes to get to what you want. The free version of the app only allows you to save 20 food items, and you can’t save complete meals. When I searched certain foods–or even scanned them directly with Food Scanner–the nutritional information was wrong. (I can understand this with the Daily Burn app, but was very surprised to get mistakes with the Food Scanner). Constantly reminded in app (and on website) to upgrade to Pro version. As with My Fitness Pal the app requires an Internet connection to use.

Overall Comparison Summary

As I mentioned before, both applications are good for counting those calories. Daily Burn has an advantage when you pair it with the Food Scanner app, but I would have to say for regular use My Fitness Pal just works better. The fact that I can create meals saves more time than the ability to scan bar codes, and the user interface is clean, simple & easy to navigate. But don’t take my word for it, test drive the apps yourself. For me, I’m going to use My Fitness Pal for the rest of John P’s GetHealthy challenge.

Get Healthy or Die Talking About It

Good morning and welcome to my blog. I’m kickin’ off 2010 with a post on joining John P’s Health Challenge.

It’s been two years of talk, but so far no results in my plan to get healthy. As of this post, I weigh 215lbs, with a BMI 35.6, my waist is 42 inches, my stomach is 45 inches. I stand 5ft 6in tall. My neck is bigger than my biceps, and last time I bent over to tie my shoe I farted and scared the dog. You might be asking, “Just how in the hell could you let yourself go like that?” Well, if you’ve made a spontaneous purchase of fitness equipment during a 3am infomercial, only to refuse the shipment on delivery then maybe you understand. If you enjoy food, I mean REALLY enjoy food, then you’re speaking my language. If you’re busy doing other things then you might get it. To know me, is to know a highly motivated guy. I just haven’t focused my energy on my health. Shame on me. Here’s a quick timeline recap of my attempts to get fit:

May 31, 2008 – Wii Not Be Fit – view the cartoon fat version of me. My first documented attempt at getting fit. BMI 30.46, Weight 196.5lbs.

Dec 11, 2008 – It’s Not About Weight It’s About Getting Healthy – I use the phrase “two tugboats bumping”, laughter ensues. BMI 31.57, Weight 196.5lbs.

Jan 25, 2009 – Fit Photographers Update – My last documented progress report about a week after hospital discharge. The fitphotographers website has since gone offline. I’m hoping they stayed motivated where I did not. BMI 31.57, Weight 202lbs.

I encourage you to read those posts, it will give you some insight into how I managed to reach my current condition.

So what’s different now? At the moment nothing–I’m still a fat ass typing up a blog entry–BUT I’m hoping to execute my fitness plans better this go around. Step #1 is trying to follow the plan outlined by my friend John P over at One Man’s Blog. Part food, part fitness, it’s the social media support system that will help maintain discipline in my routine. That and a strong competitive streak might just keep me inline. Look for daily updates via Facebook & Twitter, and a weekly blog update on this topic of fitness. Step #2 is getting with my pal John Hays who’s all about being fit with Team Beachbody. He’s motivated enough for the two of us, which is good seeing as how I’m typing this and still have doubts.

“You can’t quit quitting.”

Heard that once, thought it was stupid, but then I’m the guy with the 45 inch waist…